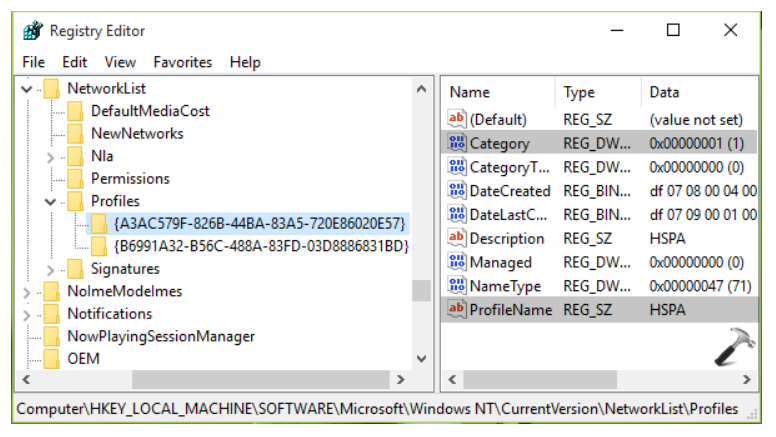
3. At this registry location, expand the Profiles key in the left pane. Then you’ll see long sub-keys with different Globally Unique Identifiers (GUIDs). The number of sub-keys here equals to number of networks you’ve joined till date and each network has a unique sub-key. In the corresponding right pane of sub-key, locate the ProfileName registry string. Its Value data should correspond to the name of respective network. So in this way, select the GUID for your network and in the right pane, look for Category named registry DWORD. Double click on it to modify its Value data and so the location type:
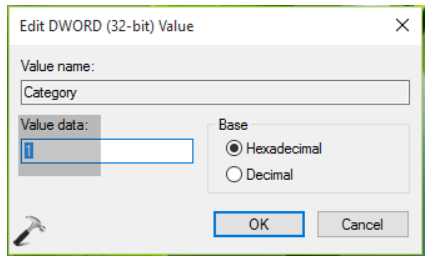
4. In the above shown box, set the Value data to 1 for Private, 0 for Public and 2 for Domain network. Click OK after making the registry manipulation and close the Registry Editor.
Restart or reboot your system to make changes effective.
1. Create a script in init.d called lampp sudo gedit /etc/init.d/lampp
2. Paste this code on the script and save
#!/bin/bash
/opt/lampp/lampp start
3. Give -x permissions to the file sudo chmod +x /etc/init.d/lampp
4. Use update-rc.d to install init scripts to all runlevel by typing sudo update-rc.d lampp defaults
Usamos cookies para armazenar informações sobre como você usa o nosso site e as páginas que visita. Tudo para tornar sua experiência a mais agradável possível. Para entender os tipos de cookies que utilizamos, clique em Definições dos cookies. Ao clicar em Eu concordo, você consente com a utilização de cookies. Política de privacidade
Este site usa cookies para melhorar sua experiência enquanto você navega pelo site. Destes, os cookies que são categorizados como necessários são armazenados no seu navegador, pois são essenciais para o funcionamento das funcionalidades básicas do site. Também usamos cookies de terceiros que nos ajudam a analisar e entender como você usa este site. Esses cookies serão armazenados em seu navegador apenas com o seu consentimento. Você também tem a opção de cancelar esses cookies. Mas desativar alguns desses cookies pode afetar sua experiência de navegação.
Os cookies necessários são absolutamente essenciais para o funcionamento adequado do site. Esta categoria inclui apenas cookies que garantem funcionalidades básicas e recursos de segurança do site. Esses cookies não armazenam nenhuma informação pessoal.
Quaisquer cookies que possam não ser particularmente necessários para o funcionamento do site e sejam usados especificamente para coletar dados pessoais do usuário por meio de análises, anúncios e outros conteúdos incorporados são denominados cookies não necessários. É obrigatório obter o consentimento do usuário antes de executar esses cookies no seu site.